Wednesday, December 28, 2011

Bruschetta with Tomatoes & Basil


Christmas is over and now we are all gearing up for the new year. I love Christmas. I can't quite say the same about new year.   New year always makes me wonder where the year went to.  It makes me wonder if I spent the time well and whether the coming year will be a better one.  (Pray for me that it will be!)


We had a wonderful Christmas.  A rather tiring one though, as we are in the midst of doing up our apartment.  So the long weekend was spent cleaning, fixing up shelves, tables and moving all our stuff from one room to another, which explains why I didn't have much time to post during the Christmas holidays.  Hopefully we can get our apartment fully furnished by the Lunar New Year. 

We had quite a bit of baguette leftover from our Christmas dinner and I decided to make a simple and healthy (I think!) lunch for myself yesterday.  This makes a wonderful appetiser for dinner parties. 


Brushchetta with Tomatoes & Basil
makes 12 appetiser servings

6 roma (plum) tomatoes, diced
3 cloves garlic, mince 2 cloves, leave 1 whole
1/4 cup extra virgin olive oil
2 tablespoons balsamic vinegar
1/4 cup fresh basil, stems removed, julienned
1/4 teaspoon salt
1/4 teaspoon ground black pepper
1 French baguette
olive oil for grilling baguette


Directions
- In a large bowl, combine the roma tomatoes, minced garlic, extra virgin olive oil, vinegar, basil, salt, and pepper. Allow the mixture to sit for 10 minutes.               
- Cut the baguette into 3/4-inch slices. Drizzle the baguette slices (both sides) with olive oil and place them on a heated frying pan and grill them till the underside turn golden brown on one side.  Flip them over and grill them on the other side. Rub the clove of garlic on one side of each baguette slice.
- Divide the tomato mixture evenly over the baguette slices.

Thursday, December 22, 2011

Grilled Nectarines with Honey


I have been seeing nectarines and peaches in every supermarket I patronise in the past few weeks.  So I couldn't resist getting a few of these pretty fruits for myself.  I wanted to have them with ice-cream, but thinking of my burgeoning waistline (sigh.. this always happens during the festive season!), I decided to have them grilled with honey instead.  Easy, healthy treat in just a few minutes - quarter the nectarines and place them on the grill.  I grilled them on all sides till the grill mark appears.  Serve hot with a drizzle of honey.  Don't they look like a perfect summer time treat?? 

Wednesday, December 21, 2011

Creamy Mushroom Pasta


The sun is finally out today!  It has been dark and rainy in Singapore the past 2 days.  I happened to be surfing through PinInterest and chanced upon this recipe from sweet paul.  It made a hearty, sunny lunch... The only thing I would change in the recipe would be reducing the amount of cream.  Other than that, it was a great recipe!  Thanks, Paul!  :)


Creamy Mushroom Pasta (adapted from sweet paul)
serves 4

225g of mushrooms, chopped 
1 onion, chopped
2 cloves of garlic
1/2 cup chicken stock
1-1/2 cup cream
2 tbsp fresh dill, chopped
4 servings of pasta
shaved parmesan cheese

Directions
- Heat up a pan and saute mushrooms, onion and garlic in 2 tablespoons olive oil until the mushroom starts - to golden and the onion is soft.
- Add 1/2 cup chicken stock, 1 1/2 cup cream and 2 tablespoons chopped fresh dill.
- Let it simmer for 5 minutes and season with salt and pepper

- Cook up enough pasta for 4 people, remember to ad salt to the water.Boil until al dente.
- Strain and place in a bowl. Add the sauce, mix and serve with shaved parmesan on top.

Tuesday, December 20, 2011

Dark Chocolate Rum Truffles


I am joining in the holiday cheer with rich and dark chocolate truffles!  I found out from joyofbaking.com that they are called truffles as they are supposed to look like the real truffle fungus, so I didn't make mine very round and pretty.  The cocoa powder is also meant to simulate the real 'dirt' that truffles grow in.  I love the richness of truffles..and I think they make good gifts from the kitchen!


Dark Chocolate Rum Truffles (Recipe adapted from joyofbaking.com)
makes 30 small truffles (I made 25)

227g dark chocolate (70% cocoa), cut into small pieces
1/2 cup (120 ml) heavy whipping cream (double cream) (35-40% butterfat)
2 tbsp (28 grams) unsalted butter, cut into small pieces
2 tbsp rum (optional)
Cocoa powder, sifted, for coating truffles
Directions
- Place the chopped chocolate in a medium sized heatproof bowl. Set aside. 
- Heat the cream and butter in a small saucepan over medium heat. Bring just to a boil.
- Immediately pour the boiling cream over the chocolate and allow to stand for a minute or two. Stir with a rubber spatula until smooth. (If the chocolate doesn't melt completely, place in the microwave for about 20 seconds, or over a saucepan of simmering water, just until melted.) 
- If desired, add the liqueur. Cover and place in the refrigerator until the truffle mixture is firm (this will take several hours or overnight).
- Place your cocoa powder for the truffles on a plate. Remove the truffle mixture from the refrigerator. With your hands, a small ice cream scoop, a melon baller, or a small spoon form the chocolate into round or mis-shaped bite-sized balls. Immediately roll the truffle in the coating and place on a parchment lined baking sheet or tray. 
- Cover and place in the refrigerator until firm. 
- Truffles can be refrigerated for a couple of weeks or else frozen for a couple of months. Bring to room temperature before serving.

Friday, December 16, 2011

Chocolate Meringues with Raspberries and Caramel Sauce


I think I chose the wrong day to make meringue cos I was an absolute klutz yesterday!  Having said that, I'm glad that my third attempt at meringues turned out fine.  My 1st attempt burned, my 2nd bled. They are such fragile little things that 2 of them cracked while I was handling them for the photos (Klutz Attack I), so I had to be extremely gentle as I had only 4 meringues to 'play' with.   

Klutz Attack II - After I layered my whipped cream on to the meringues and placed the raspberries on the top, i knocked my cup of caramel on the floor!  I was totally bummed! Firstly cos I just cleaned the floor the day before, and secondly because I had to mop up the floor quickly, which prevented me from taking photos immediately.  (These meringues have slightly chewy centres, they collapse under the weight of the cream and raspberries after a few minutes.. if you are making them, serve them immediately after placing the toppings!) So you can imagine how frantic I was. 

Anyway, I'm thrilled that my meringues were successful. However, I prefer a crisper meringue, so for my next try, I shall leave them in the oven a while more.  I've also found rather good instructions from this website on making meringues.. happy reading!


Chocolate Meringues with Raspberries and Caramel Sauce
(adapted from Delicious Magazine)
makes 6 meringues

Meringues:
4 eggwhites, at room temperature
1-1/2 cups caster sugar (I reduced it to 1-1/4 cups but I still found it too sweet.  Suggest reducing it to 1 cup)
a pinch of salt
1 tbs cocoa, sifted
1 tsp white vinegar
1 tsp corn flour
1 tsp vanilla extract
300g raspberries

Whipped Cream:
150 ml thickened cream
2 tbs icing sugar, plus extra to dust (I didn't mix the icing sugar into the cream as I thought the whole dessert would be too sweet)
1/2 tsp vanilla extract

Caramel:
(I made only half of the quantities stated below and it was more than enough for drizzling over 6 meringues)
1 firmly packed cup brown sugar
110g unsalted butter
1/4 cup pure (thin) cream


Directions
- Preheat oven to 150*C. Line a large baking tray with baking paper.
- Whisk eggwhites in the bowl of an electric mixer with a pinch of salt until soft peaks form.  Add caster sugar, 1 tbs at a time, whisking until thick and glossy.
- Fold in cocoa, vinegar, cornflour and 1 tsp vanilla until well combined.
- Dollop 6 rounds of the mixture onto the line tray.  Use the back of a spoon, make a slight indent in the top of each one.
- Place in the oven and immediately reduce the temperature to 120*C. Bake for 45 minutes then turn the oven off and leave the meringues in the oven to cool completely.  (This meringue as a soft centre, if you want a crisper meringue, suggest baking for 1 hr.  Cooling should take about 3-4 hrs.  I took mine out after 2 hrs and they were still slightly warm)

- Meanwhile whisk thickened cream and sifted icing sugar with 1/2 tsp vanilla.  Cover and chill until ready to use.

- Place brown sugar, butter, pure (thin) cream and 1 tsp vanilla in a pan over low heat.  Stir until butter has melted, then simmer for 2 minutes or until a golden caramel.  Remove from heat then set aside to thicken and cool.

- To serve, top each meringue with whipped cream and raspberries.  Drizzle with caramel and dust with icing sugar.

Wednesday, December 14, 2011

Homemade Pizza - my 2nd attempt!


It's my 2nd attempt at making pizza. My first (a couple of weeks back) was a complete disaster.  So this time around, I decided to go for something safer - following Donna Hay's recipe and making a simple, classic pizza.  Tasted rather good served with chilli flakes!

Here's a question to all  - Is pizza dough supposed to be sticky?  My dough was rather sticky and I had to add slightly more than 2 tablespoonfuls of extra flour in it. 

And I realised that I should have followed the recipe in rolling out the dough to 26cm in diameter.  I rolled it to about 19cm only, and my pizza base turned out a little too thick!  The good news... I made one pizza only, so I have leftover dough for another try tomorrow!


Basic Pizza Dough (adapted from Donna Hay)
makes 2x26cm large pizzas or up to 8 mini pizzas

1 tsp dried yeast (I used rapid-rise yeast and reduced it to slightly more than 3/4 tsp)
1/4 tsp caster sugar
3/4 cup (180ml) luke warm water
1-1/2 cups (225g) plain flour
1/2 tsp sea salt

Directions- Place the yeast, sugar and water in a bowl and mix to combine.  Set aside in a warm place for 10 minutes or until bubbles appear on the surface. (I skipped this step as I used rapid-rise yeast. I mixed everything in the step below)
- Place the flour and salt in a bowl and make a well in the centre.  Add the yeast mixture and mix together with a wooden spoon to form a dough. 
- Knead the dough on a lightly floured surface for 4-5 minutes or until smooth and elastic. (I used my kitchenaid instead!)
- Place the dough in a large bowl, cover with a clean, damp cloth and set aside in a warm place for 25-30 minutes or until the dough has doubled in size.  (I had to wait for an hour)


Classic Margherita (adapted from Donna Hay)
serves 4

1 x quantity basic pizza dough (as above)
1/3 cup (80ml) tomato puree
2 cups (200g) Pizza cheese
250g cherry tomatoes, halved
sea salt and cracked black pepper
1/2 cup basil leaves
olive oil for brushing and drizzling

Directions
- Preheat oven to 220*C.  Divide the dough into 2 balls and roll out on a lightly floured surface to 26cm rounds. 
- Place the rounds on 2 lightly greased baking trays.
- Spread the bases with the tomato puree leaving a 1cm border and sprinkle with pizza cheese.
- Add the tomatoes, sprinkle with salt and pepper and bake for 12-15 minutes or until the topping is golden and the base is crisp. (I baked for 15 mins and my cheese was burnt, so bake at 12 mins and check constantly if you add more baking time)
- Top with basil leaves and drizzle with olive oil to serve.

Tuesday, December 13, 2011

Back from Penang


View from Penang Hill.  That's the Penang Bridge.

I just came home from a weekend trip with my mum, elder sister and her family in Penang.  We spent three wonderful days in the bustling little Malaysian state touring, eating and shopping. 

It was my second trip to Penang.  The first was a couple of years back with my hubby before we were married.  It was a different Penang I experience this time around.  The first trip, my hubby and I went a lot around Georgetown exploring on foot looking at the old shophouses.  At that time, I hadn't picked up photography yet, so while my hubby was going around with his camera, I just stood around waiting for him. 
 
This trip, I went armed with my camera.  However, as this trip involved a whole group of us (mum, bro-in-law, sis, little nephew and niece), it was more of a touristy trip instead of a exploratory one.  It was tough taking pictures due to our tight schedule and I found that half the time was spent trying to keep up with my family who were walking ahead of me as I went around taking photos, and the other half was spent looking out for my little nephew and niece ensuring that they were safe.  Yes, even though I'm not their parent, I make a pretty good over-anxious aunt!   


Mid-way through the trip, I gave up taking photos.  I was rather upset with myself initially, but after a while, I reasoned that some things just cannot be rushed.  So I decided to give myself a break, enjoy the moments spent with my family instead and soak in the hustle and bustle of Penang.   

The other part of the trip I loved.... The food and the shopping! I found quite a lot of props from this shop called Material and spent a good fifteen minutes wow-ing at almost everything I saw in the store.  Oh the joy of retail therapy... falalalalallalaaa...


Wednesday, December 7, 2011

William Sonoma's New Orleans-Style Beignets!


Today I found out the difference between doughnuts and beignets..  For the longest time, I thought beignets different and more exotic than doughnuts.. but after looking them up on the internet, I realised that they are essentially  the same, except that beignets are squarish and without the hole in the centre.  

The first lesson today.. How to pronounce beignets?  This is one those items on a food menu that I will go out at all costs and avoid ordering.. It's like going to an Italian restaurant and pointing out what you want on the menu to the waiter/waitress, instead of ordering it aloud.  


The word beignet is pronounced bey-YAY beyn-yay... Did that come as a shock to you?!  Yeps! It's not bey-ney, or bey-net but beyn-YAY!

Here's a little bit of history on the bey-yay which I 'pilfered' from whatscookingamerica.net. 

Beignet comes from the early Celtic word bigne meaning "to raise." It is also French for "fritter." Beignets, a New Orleans specialty, are fried, raised pieces of yeast dough, usually about 2 inches in diameter or 2 inches square. After being fried, they are sprinkled with sugar or coated with various icings.

Beignets are like a sweet doughnut, but the beignet is square shaped and without a hole. Beignets are considered the forerunners of the raised doughnut. For many years, beignets were shaped into balls or squares and covered with mocha frosting. Later the beignet was cut in the shape of a doughnut, and the raised doughnut was born.


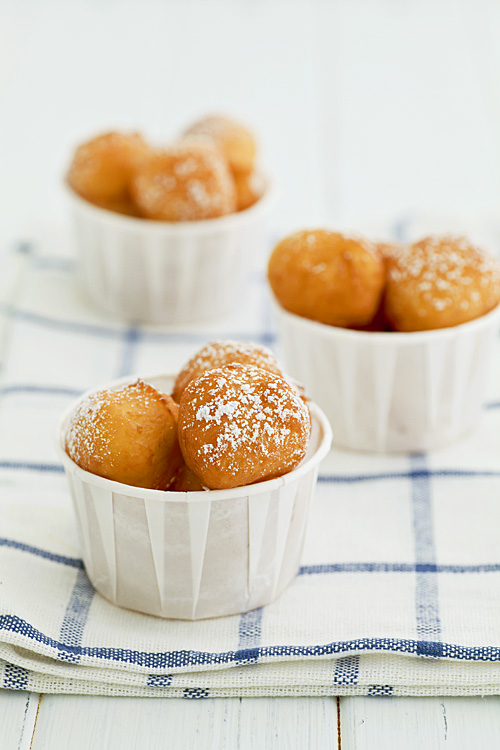
Ok, so you've read that beignet are supposed to be square-shaped.. and from the William-Sonoma recipe, they were supposed to be diamond in shape.. But I couldn't for the life of me cut the dough up nicely and cleanly!  Maybe my knife wasn't sharp enough, whatever it is, I couldn't do it.  And I didn't have a circular cookie cutter.. So I ended up using the cover of my Masterfoods cayenne pepper bottle, and it worked out really well.  I was worried that the fritters would end up really small, but they poofed up during frying.

Unlike doughnuts which you fry one side and flip to the other side to continue frying, the beignets are round, light and small, it was difficult to get them to flip and brown evenly. And my first few fritters was burnt! Then I found that the best way to keep them from being burnt is to keep  nudging, moving and spinning them around in the oil (sort of like pushing ping pong balls in water) so that they are fried on all sides.. I know it doesn't sound very professional, but it worked for me! 


New  Orleans-Style Beignets
makes about 40 beignets (I made half the recipe and had around 40 little balls)

1/2 cup heavy cream
1/4 cup granulated sugar
2 tbsp unsalted butter at room temperature
1 large egg, beaten
1 package (2-1/4 tsp) quick-rise yeast
3/4 cup cold water
3-3/4 cups all-purpose flour, or as needed
1/2 tsp fine sea salt
Canola oil for deep frying
Confectioners' sugar for serving

Directions
- In the bowl of a stand mixer fitted with the paddle attachment, combine 3/4 cup cold water, the cream, sugar, butter, egg, and yeast.  (I had problems with this part, the moment I mixed room temperature butter with cold water, the butter became cold and couldn't be mixed in properly.  There were bits and pieces of butter floating around in the batter.  So, I suggest mixing the butter and cream thoroughly first before adding the cold water.)
- Add 3 cups of flour and salt.  With the mixer on medium-low speed, add enough dough of the remaining flour to make a soft dough that does not stick to the bowl.  Remove the paddle attachment and fit the stand mixer with the dough hook attachment.  Knead the dough on medium-low speed, adding more flour if needed, until the dough is smooth but still soft, 6-7 minutes.  Shape into a ball.
- Lightly butter a large bowl.  Add the dough and turn to coat with the butter.  Cover the bowl tightly with plastic wrap.  Let the dough rise in a warm spot until it doubles in bulk, 1-1/2 to 2 hrs. 
- Line 2 baking sheets with parchment paper.  Punch down the dough and turn out onto a floured surface.  Dust the top of the dough with flour.  Roll out into a large rectangle about 1/4inch (6mm) thick.  Using a pizza wheel or a sharp knie, diagonally cut the dough into 2-inch (5cm) strips.  Cut in the other direction, also in diagonal 2-inch (5cm) strips to create diamond shapes. Transfer to the baking sheets and loosely cover with plastic wrap.  Let stand in a warm spot until the beignets rise slightly, about 15 minutes.
- Pour the oil to a dept of at least 3 inches (7.5cm) into a deep, heavy saucepan and heat to 180*C on a deep frying thermometer.
- Using a metal spatula, carefully lower a few of the beignets into the hot oil, being sure not to crowd the pan.  Deep-fry the beignets, turning often, until puffed and golden brown, around 3 minutes.  Using a wire skimmer, transfer to a rack to drain. Generously dust with confectioners' sugar, and serve at once.

Tuesday, December 6, 2011

latest addition!


Prop collecting for food photography can be so addictive!   My hubby bought this little shovel for me yesterday.  I love it! 


Friday, December 2, 2011

Melt-in-Your-Mouth Chocolate Cake


I've learnt to accept the fact that chocolate will always be part of my diet.. During my primary school days, I used to save twenty cents from my daily allowance of fifty cents to buy a small and thin bar of van houten from the provision shop near my house, almost on a daily basis.  Now that I'm all grown up, I still fall into the trap of nibbling chocolate on..ahem.. a daily basis.. 

I was searching online for a chocolate cake recipe, and I stumbled upon this recipe from the blog, Chocolate & Zucchini.  She named it "Melt-in-Your-Mouth Chocolate Cake".. Now.. How can anyone resist making a cake with a name like that?!  I certainly couldn't!


This is an almost flourless chocolate cake and it is rather easy to make.  The only thing I would do differently the next round would be to reduce the amount of sugar to maybe 170g, or switch to brown sugar (I used caster sugar).  However, I discovered that if you were to serve this with unsweetened whipped cream, then the sweetness is well balanced out.  

Thursday, December 1, 2011

A bunch of flowers to cheer me up

argghh... it has been a frustrating day in the kitchen and in photography today!  everything didn't work out well..  my asparagus shrivelled up like dried grass in the oven.. i guess it's because they were so skinny to begin with!  my only consolation -- i managed to sneak a quick photo before they went into the oven.  don't they look like a lovely bunch of wild flowers?


Monday, November 28, 2011

Chicken & Soba Noodle Salad


I borrowed Neil Perry's "Good Food" from the library last week mainly to look at the drool-worthy pictures.  Well, one of the recipes caught my eye, and it made a wonderfully light lunch for me today.  The recipe was simple and extremely appetising even though I didn't manage to get hold of all the ingredients listed in the recipe. 


Crab & Soba Noodle (adapted from Neil Perry's Good Food)
serves 4

250g picked fresh crab meat (I substituted with shredded chicken**)
270g packed dried soba noodles
1 red capsicum, seeds removed and cut into julienne
1 lebanese (short) cucumber, seeds removed and cut into julienne (I used japanese cucumber, worked out well)
3 spring onions, thinly sliced on the diagonal
1 handful mint leaves, rinsed (I left this out, couldn't find mint leaves in the supermarket)
1 handful coriander leaves, rinsed
1 teaspoon sesame seeds, lightly roasted (I left this out too)
freshly ground pepper

sesame soy dressing:
3 tbsp sesame oil
1 tbsp light soy sauce (I added a splash more)
3 tsp rice wine vinegar
1 tbsp finely diced fresh ginger
1 garlic clove, finely chopped
1 tbsp caster sugar

Directions
- Cook the noodles in boiling salted water until just tender, then refresh in cold water and drain well
- To make the dressing, place all the ingredients in a jar with a tight fitting lid, seal and shake vigourously.  Set the dressing aside. (I poured all the ingredients in a bowl and mixed with a small whisk)
- For the salad, simply mix the noodles, capsicum, cucumber, spring onion and herbs together, and toss gently with half the dressing.  Place the noodle sald in the centre of four serving plates.  Divide the crabmeat (chicken) among the salads, sprinkle with sesame seeds and drizzle with the remaining dressing.  Give a good grind of fresh pepper and serve.

* You can exchange the crab for prawns, scallops, lobster or chicken.
** To prepare the chicken, boil a piece of chicken breast meat until fully cooked through (around 15-20 mins).  Set aside to cool.  Shred the chicken meat when fully cooled.

Friday, November 25, 2011

Double Chocolate Chip Muffins


Do you remember Enid Blyton's The Magic Faraway Tree series?  Recently my friend posted that she bought the book to reminisce.  I loved the whole series with the magical lands, Moonface, Saucepan Man, Silkie, the slippery slide, etc.  Wouldn't it be great if we can make pop biscuits?!  And toffee shocks would be perfect for Halloween! 

Today, I happen to be in the Land of Indecisiveness and Absent-mindedness.  It took me approximately an hour and a half to decided whether I should make a Triple Chocolate Muffin or a Chocolate Chip Muffin (Tough decision, rite? Don't roll your eyes!). 


Well, I finally decided to go with a simple Chocolate Chip Muffin recipe which I found on AllRecipes.com.  While I was midway through measuring all the ingredients, I realised that I had sifted self-raising flour instead of all-purpose flour.  Yes, I know it's not a big mistake as self-raising flour is similar to all-purpose just that it has baking powder pre-mixed into it.  But given that I'm rather new to baking, I'm usually quite a stickler to recipes.  And I had absent-mindedly poured out 1/4 cup of white chocolate chips which isn't required in the recipe. Arrghh.....  

So due to my sheer brilliance, today's bake of plain chocolate chip muffins became Double Chocolate Chip Muffins! 


Double Chocolate Chip Muffins (adapted from AllRecipes.com)
makes 12

2 cups all-purpose flour
1/2 cup white sugar
3 teaspoons baking powder
1/2 teaspoon salt
3/4 cup milk (Based on others' comments, I increased it to 1 cup milk)
1/3 cup vegetable oil (Based on others' comments, I increased it to 1/2 cup oil)
1 egg
3/4 cup mini semi-sweet chocolate chips (I used 1/2 cup dark chocolate, 1/2 cup white chocolate)
3 tablespoons white sugar
2 tablespoons brown sugar

Directions
-Heat oven to 400 degrees F (205 degrees C). Grease bottoms only of 12 muffin cups or line with baking cups.
- In a medium bowl, combine flour, 1/2 cup sugar, baking powder, chocolate chips, and salt; mix well. In a small bowl, combine milk, oil and egg; blend well. Add dry ingredients all at once; stir just until dry ingredients are moistened (batter will be lumpy.)
- Fill cups 2/3 full. Sprinkle tops of muffins before baking with a combination of 3 tablespoons sugar and 2 tablespoon brown sugar.
- Bake for 20 to 25 minutes or until toothpick inserted in center comes out clean. Cool 1 minute before removing from pan. Serve warm

Wednesday, November 23, 2011

Pasta Carbonara - The Nigella Way


The one thing I've learnt ever since I stepped into the kitchen this year is that organisation matters.  Yes, very much so!  It helps that your kitchen is organised, and it definitely helps if you read the recipe thoroughly and plan your cooking process.

I think everyone knows that I'm a huge follower of Nigella by now.  I've made her pasta carbonara 3-4 times already, and they have not failed me yet!  But the two reasons I like about making this dish are firstly, it's fast, and secondly, somehow I have the planning and timing all down to a pat (well..like I said, I have cooked it 3 or more times..), so it makes me feel.. ahem.. like a very experienced cook!


There were 3 things that happened in the kitchen today that made my life a little more exciting than usual :
1) I uncorked my first bottle of wine (I know.. this sounds so pathetic right? But there's always a first time for everyone! Mine just came 30 years late).  It was tough! I had to watch a video on youtube before I knew how to use the corkscrew.  The sommelier made it look so easy, but I took around 15 minutes to wrench the cork out!  That 15 minutes was probably more exhausting than my 45 minute swim this morning.
2) Fire in Pan! Usually when I add wine while cooking, it usually just sizzles and reduces.  Earlier when I was cooking the bacon, I poured the wine in too quickly and there was a huge flame that came out of the pan!  It freaked me out at that moment, but thinking back, that was so awesome! It's like how the chefs cook on tv.  Having said that, I probably won't attempt it again.
3) I've learnt how to plate my pasta using the twirl method. This is all thanks to blogger, Xiaolu (6 Bittersweets.com).  I was reading her tips on food photography and styling, and it works (though I probably need more practice!)!


Alright, enough of my rambling. And here's the recipe. I recommend watching Nigella's video before your attempt.  You'll find out how easy this recipe is after viewing the video.  Based on her video, I omitted the cream and nutmeg, and the pasta still tastes as good!  And less sinful.  The trick to making this dish fast is to cook your pasta first.  While it's in the boiling water, prepare the the beaten egg and parmesan cheese mixture and set aside.  Cut the bacon or pancetta into small pieces and set aside.  When you have about 4 minutes left of pasta cooking time, bring out the saucepan, heat the olive oil and start frying the bacon.  Everything moves like clockwork then ;)

Tuesday, November 22, 2011

Pork Chops with Balsamic Mushrooms


I don't know if anyone would believe it, but this is one of the easiest meals I've ever cooked.  I found this recipe in one of  Donna hay's magazines - Fast 50 Favourite Things. 


What drew me wasn't the meat.. but the button mushrooms! Button mushrooms were my absolute favourite when I was a kid.. And I grew up on the Narcissus brand.. Yummy meal that took less than half an hour to prepare (marinating time included!)!


Pork Cutlets with Balsamic Mushrooms (adapted from Donna Hay)
I couldn't find pork cutlets at my local supermarket, therefore I used pork chops instead.
I've typed out Donna Hay's original recipe in here.

4 x 200g pork cutlets
olive oil
2 cloves garlic, crushed
2 tbs of rosemary sprigs (I didn't have rosemary, so I used thyme instead)
300g of button mushrooms

Directions
- Marinate the cutlets in 1 tbsp olive oil, crushed garlic and rosemary sprigs for 10 minutes
- Heat a large non-stick frying pan over high heat an cook pork for 6 minutes each side or until cooked through. (I only required 3-4 minutes on each side for the pork chops)
- Remove pork from pan.
- Add 1 tbsp olive oil and button musrhoom into the pan and cook for 3-4 minutes until golden.
- Serve cutlets with the mushrooms and drizzle with balsamic glaze to serve.

Saturday, November 19, 2011

Latest Love - All Things Enamel


I'm starting to have a serious love affair with enamel utensils.. The past few weeks have seen us hunting for vintage kitchenware.  Unsurprisingly, it hasn't been easy finding vintage ware in Singapore.  The good news is that we have lots of enamel! And yes.. we've been raiding our little neighbourhood shops for these pretty finds.


Monday, November 14, 2011

The Would-be Chocolate Meringue Pie

So I had an epic baking disaster today. 

I think this was probably the most difficult thing I've ever baked.  The recipe looked simple enough, like all recipes do when you first look through it, but I guess I wasn't up to it technically.


I spent a couple of hours in the kitchen making this pie.  I think I didn't get the consistency of the filling right.  The chocolate came gushing out of the tin like lava streaming down the sides of the volcano when I lifted the base up.  That's the deal with baking.  Sometimes the effort comes to nought.

I've just been hit by a disappointing turn of events recently.  Something which I thought I had in the palm of my hand suddenly took off, and away from reach.  Maybe it's not my time yet.  Maybe it's a way of telling me that I need more practice.  Maybe I have to learn to be strong, grit my teeth and deal with it.  I wish I had all the answers now,  but I don't.  Maybe this is life.  It's not about the situations that come along your way, but the attitude you choose to take when facing them. 


So I had an epic baking disaster today.
 
Am I upset?  Yes. 
Am I going to give up?  No way, Jose.

Thursday, November 10, 2011

Banana Muffins Re-visited for a Visit


I am late in my blogging this week and I am feeling ever so hassled by probably my one and only ardent fan, my husband.  He has been reminding me everyday for the past couple of days to bake something to place on the blog.  

There is sort of an unspoken pact between my hubby and myself, that I should try baking a new recipe every week.  I'm ashamed to admit that this week I have not met my kpi (key performance indicator) [boy... doesn't everyone just hate this term! I used to sigh on the inside whenever my ex-bosses mentioned this term].  There were just errands, engagements that came along my way this week that I just couldn't ____________.  haha..  I'm sure all of you will know how to complete my previous sentence.


However, I did bake this week. For my grandmother.  I wanted to bake something healthier for her and banana muffins came to mind.  So, I revisited an old recipe, and made it healthier by reducing the amount of sugar.  Hmm.. can I say that I met half my kpi??